

Section 2: Purchase Cheap Church Website Hosting

During the process of purchasing website hosting you will need to select a domain name website address.
Why do you need to choose a name for your website so early in the process?
You get a FREE Domain Name when you purchase website hosting if you use the Finding Your Church recommended website hosting.
To be fair, you can get a free domain name if you use other website hosting solutions as well. The one that I recommend is definitely not the only one out there.
However, I have found this company to be very reliable, excellent at tech support, and it is the solution I use for my WordPress websites.
The other benefit of using my recommended website hosting solution is that it will be easier for you to follow along with these tutorials.
All of the screenshots that show the web hosting administration panel throughout the process will be from my web hosting account, which will look identical to yours if we use the same one unless they adjust or change the backend design. This will make it simple for you to see exactly where to go to accomplish each step of the installation process.
No matter which website hosting company you choose, you will still need to decide on a domain name before beginning the process.
One of the biggest challenges of choosing a domain name for your site is finding one that you actually like AND is still available.
With thousands of websites being created regularly, the good names get taken pretty fast.
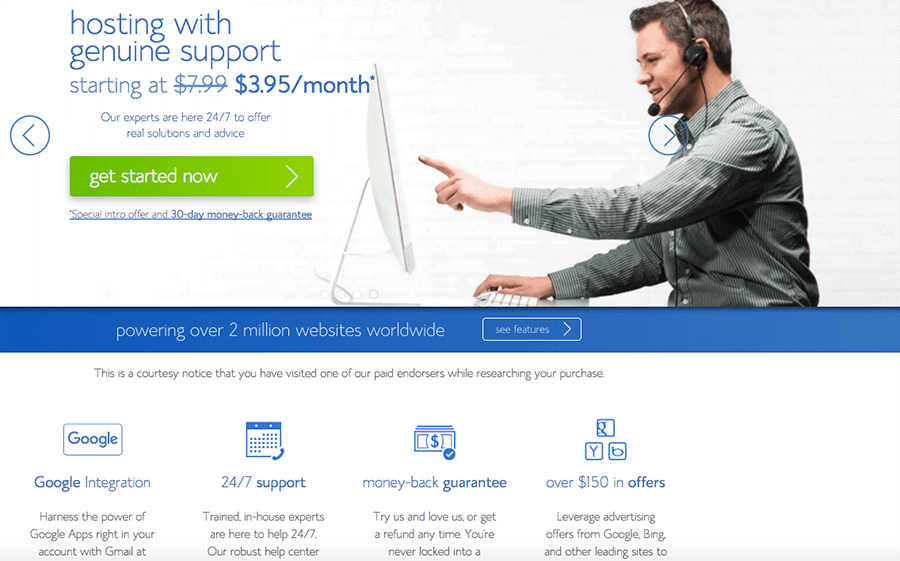
If you already know an available domain name, or if you are going to use a domain name you already own, you can go ahead and purchase website hosting here – www.BLUEHOST.com
If you have NO IDEA yet what your website address is going to be, I suggest using the search tool at www.domain.com. I have found it to be simple and easy to use.
DO NOT PURCHASE your domain name through Domain.com. You will get this FREE when you purchase Website Hosting.
When you visit www.domain.com you will want to have thought through some name options other than just your Church Name to make sure you get something that is at least close to what you want.
A couple of ways to give yourself more options is to add the word “the” or “my” to the beginning of the name. So if your Church name is Journey Church and www.journeychurch.com is not available, you could try something similar to www.myjourneychurch.com or www.thejourneychurch.com
Another solution is to include dashes in the name such as www.journey-church.com
If you do not want or cannot find a .com version, you can also look for a .TV or .CHURCH or many other extensions that are now available.
Just remember to try to keep things simple as you want to make it easy to explain to people.
Not only will you be using this web address in conversation, in print, and over the phone, but this will also be in your custom email address.
pastor@the-journey-church-of-timbuktu.com is going to get really annoying to type and explain after awhile. So keep it simple.
After you choose a domain name and find that it is available, you are ready to purchase website hosting.
Click the Bluehost graphic link below, click the “GET STARTED NOW” button on that page then follow the instructions to complete your website hosting purchase.
Step #1: Choose your Website Hosting Package
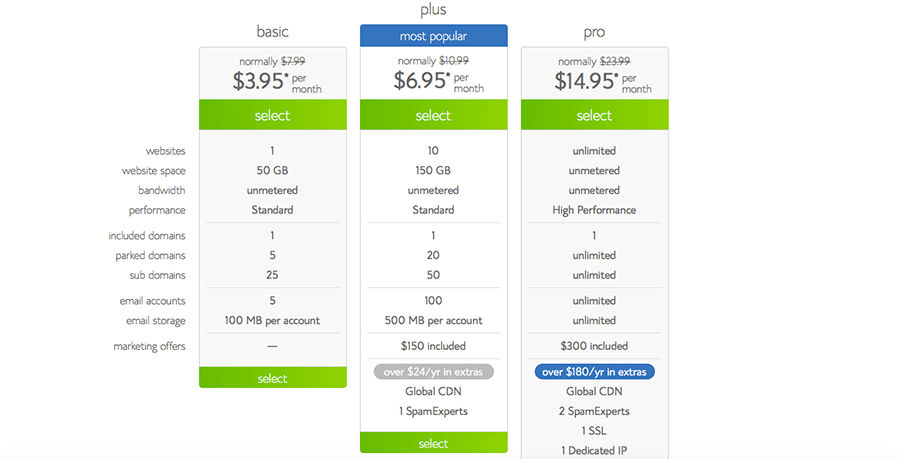
Choose the PLUS Package if you are using this website host.
Even though the Basic is a little cheaper, this package gives you the most flexibility at the cheapest price. Not only do you get more resources with this package, it also allows you to create more than one website on one hosting account. This is great for creating holiday or event specific websites or specific ministry websites. The cost of website hosting can vary and change at this company’s discretion and will also depend on which package you choose so the price in the graphic may be different.
PLEASE NOTE: Even though it gives you a per month cost, they actually charge you an annual rate. So you will pay for this website hosting YEARLY. And, you will pay a small fee yearly for your website address [domain name] after your first FREE year as well.
The monthly amount on the front page is just an example to show you what it averages out to per month. When you purchase, the cost will be for a year at a time. This is how nearly every web host does billing.
Step #2: Enter your Domain Name
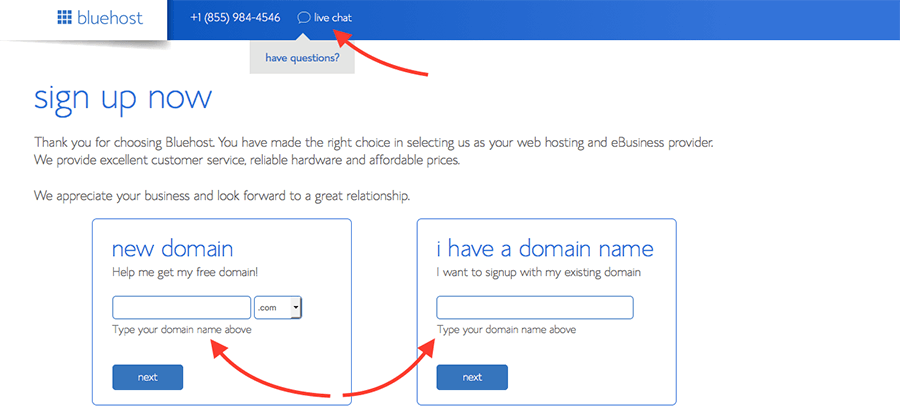
If you are starting fresh with a New Domain or wanting to use your existing Church Website domain name, enter it in the correct box, then click “NEXT”.
If at ANY POINT during the sign up process you need help, click on the “Live Chat” button at the top of your Bluehost account page when you are logged in and they will do their best to help you.
This company has EXCELLENT Chat and Phone Support, and can walk you through setup and even creating your WordPress Install if you need it.
Step #3: Enter your Contact & Billing Information
You will also be asked to choose a username and password that you will use to login to your website hosting administration panel. You will definitely want to write down and save your username and password in a place where you will be able to find it later. That should be obvious of course, but I want to remind you to write it down.
After entering your billing information, scroll down.
You will see a place to choose whether you want your hosting account for One Year or up to Three Years. You get the cheapest overall price if you purchase for Three Years of hosting in advance.
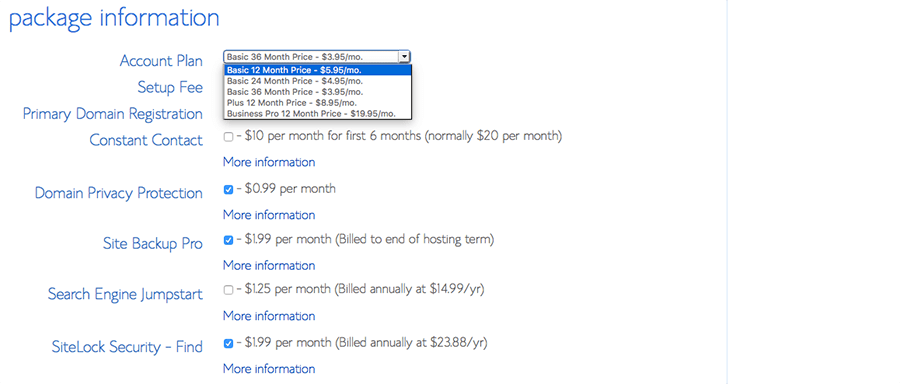
You will also see a few other options and add-ons available to purchase.
Right under the One Year – Three Year choice is domain privacy. This hides your Church or Personal contact information that is associated with your account from the web. By default it is open for anyone to see.
Domain Privacy hides that information from possible spammers and identity thieves. If that info is already going to be on your website anyway, such as on your contact page, then I probably would not worry about it. But if hiding this is important to you because it is personal information, you will want the extra peace of mind that domain privacy provides.
There are a few other products they offer. You can look those over and decide if they would be helpful to your site. I typically do not purchase them, but I am sure they are useful tools.
Remember to look this over completely as they may have some options already pre-clicked. Be sure to look over all of the boxes to make sure you do not have something clicked that you do not want to purchase.
Step #4: Click “SUBMIT” and complete the checkout process.
They will contact you by email and give you a receipt to let you know that the purchase was completed. The key thing though is that you have the username and password to get back into your account. As soon as you receive confirmation that your account has been setup, you will want to go back to Bluehost and login to setup WordPress.
Use the website hosting LIVE SUPPORT to your advantage.
One feature that I want to make you aware of is the support section of your website hosting account. Even though the process of installing WordPress is simple if you follow the instructions in this tutorial, there is always a chance something could go wrong.
I have usually found that if something does go wrong, it is my fault. There is typically something small that I did not do correctly. So before contacting support, go back and make sure you have completed all of the steps correctly as much as you know how.
But if you do hit a snag, simply click on the support button for online chat, or you can call them for phone support. That is what they are there for. I use this live support all of the time.
I prefer to use their chat support feature, because sometimes you may need to copy and paste something for them to see. It is a lot more difficult to explain a website address, link, or something you are seeing on screen over the phone. Copy and paste over chat is a much easier option.
Now that you have purchased the cheap website hosting for your new site it is time to install WordPress on your account and get started.
>> Go to Section 3: USE THE EASY WORDPRESS ONE CLICK INSTALL TOOL